
Unit is working with Visa to enable Apple Pay and Google Pay for your card program. This guide walks you through what to provide your point of contact at Unit (Implementation Manager or Customer Success Manager), and what you'll need to set up on your end.
Enabling Cards for Mobile Wallet
All cards (physical and virtual) can be configured for Mobile Wallet. Mobile Wallet enablement allows you to pay using your phone, via Apple, Google, or Samsung Pay. This setup requires some design and legal work, and timelines vary depending on wallet provider approvals.
Updates & notes
The enablement process for both Apple Pay and Google Pay has recently changed.
If you are integrating Google Pay, make sure you follow the new process described in this guide — the previous process is being retired and must be fully transitioned by end of December 2026.
We are currently seeing longer implementation times for Apple Pay and Google Pay while these new processes and systems roll out. Plan for extra lead time and start the onboarding steps early.
Mobile wallet overview
Adding a card to a Mobile Wallet (e.g. Apple Pay, Google Pay) normally requires scanning a physical card or manually typing the card number into the wallet. With the "Add to Mobile Wallet" flow, your end customers can add their card to a digital wallet with one tap, from within your app.
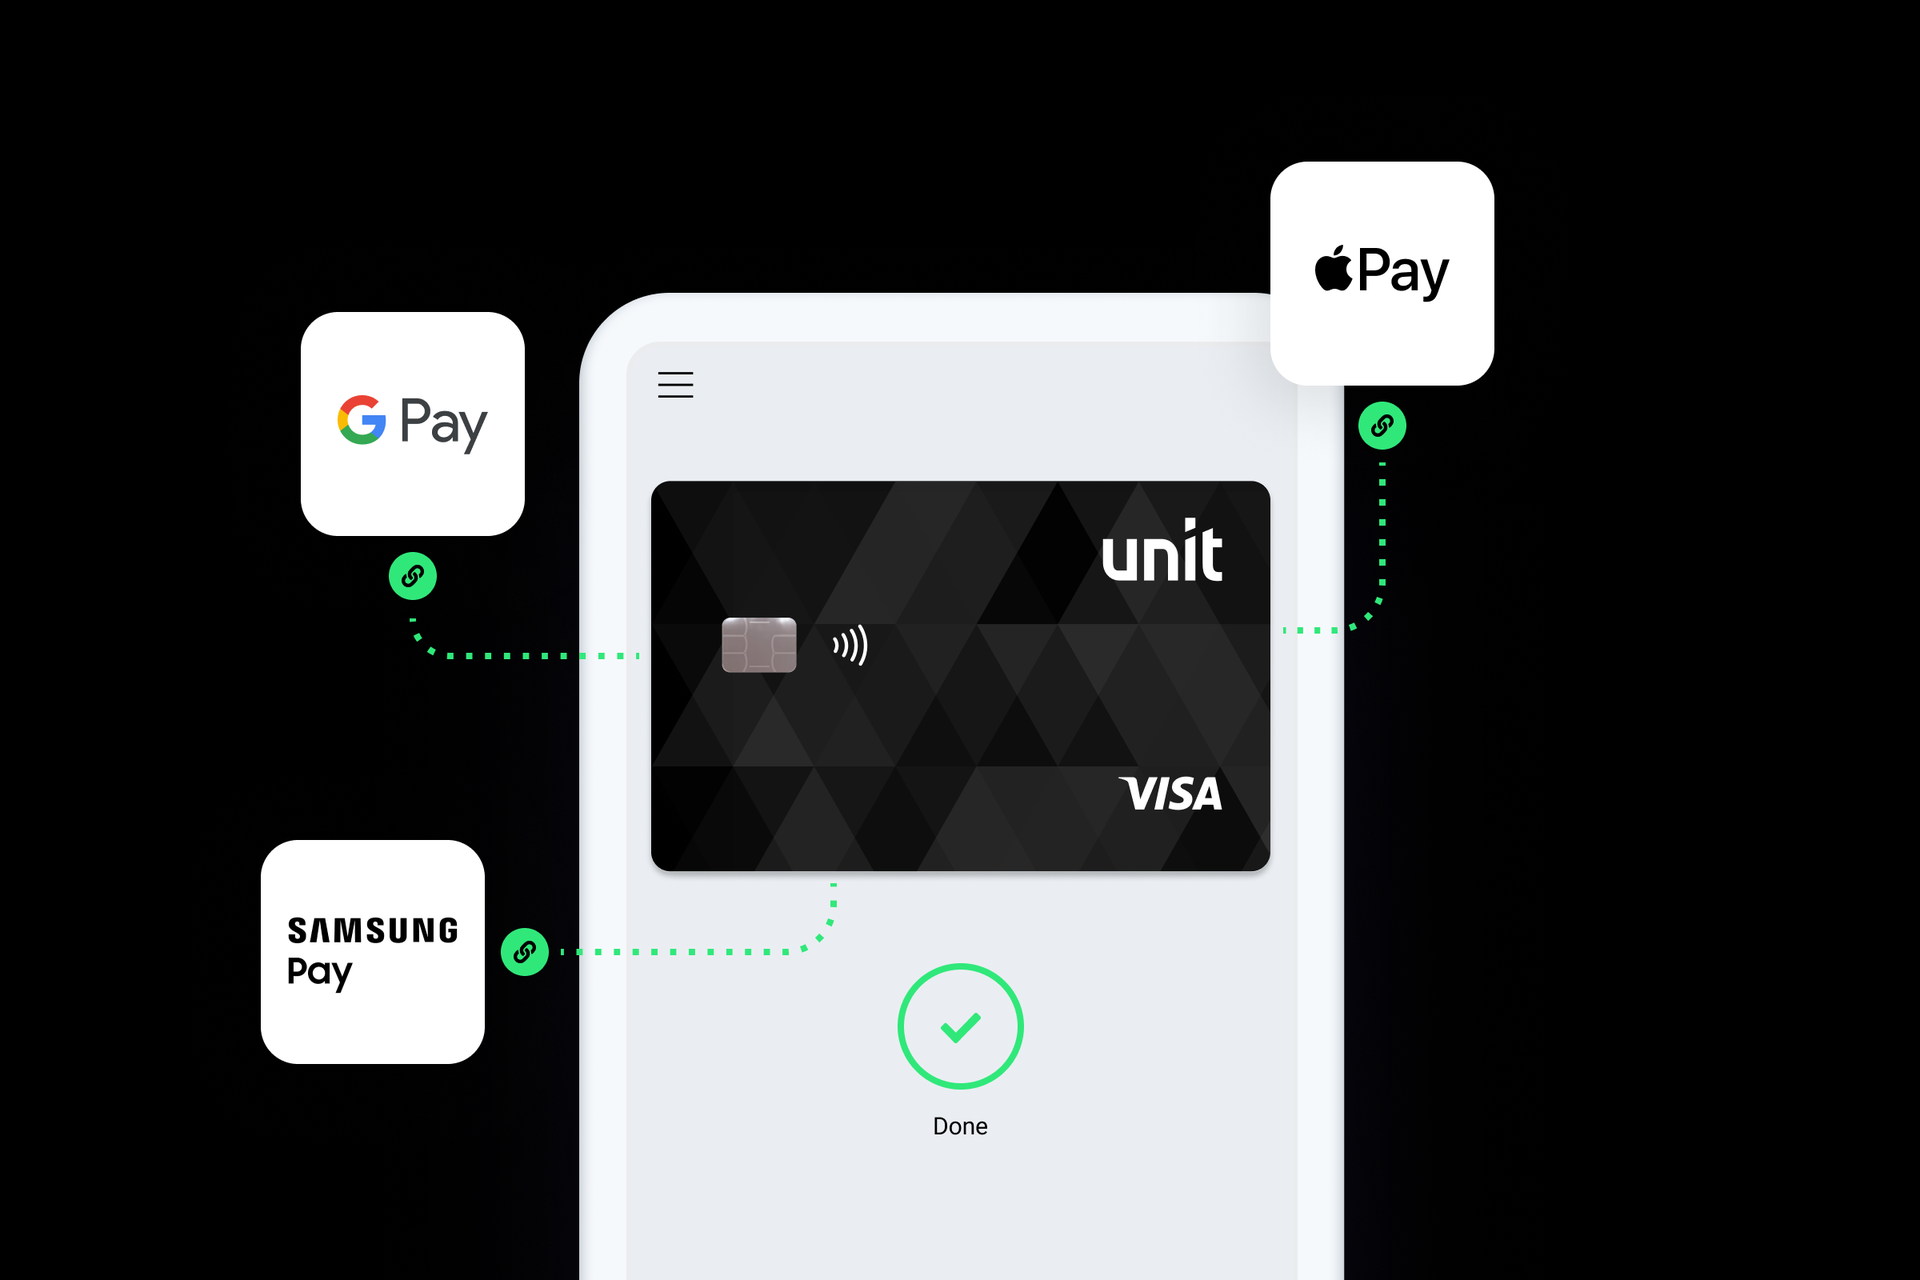
- Within your app, you add a button that lets your end customer add their card to their relevant mobile wallet.
- The customer reviews and agrees to the terms and conditions, and can immediately use the card from within the wallet.
Why it matters: letting customers add their card in seconds — right after creating a card, or any time after — reduces time-to-first-use and increases potential interchange revenue by making the card easier to use.
How enablement works
Unit issues cards through Visa DPS and coordinates your mobile wallet program with Visa as your program manager. Enablement happens in three layers, each building on the previous one:
- Visa brand approval — registers your program and card-art metadata (card art, app icon, label, colors) with Visa. This is the foundation: it must be complete before any tokenization work can begin.
- Tokenization (manual "add to wallet") — enabling your cards to be added to a wallet by scanning or typing the card number. This runs through two separate processes, managed independently:
- Apple Pay — Visa-led, through the Apple Partner Hub.
- Google Pay — client-led, through the Google Issuer Console.
- SDK / push provisioning — the one-tap, in-app "Add to Wallet" flow this guide focuses on. It's a follow-on to tokenization: once your program is approved and tokenized, Unit provides the Visa SDK package and the IDs you need.
You are responsible for integrating push provisioning in your app using the Visa Digital Enablement (VDE) SDK and Unit's Get Mobile Wallet Payload API. The platform sections below describe what Unit handles and what your team implements for each wallet.
Before you start
Contact your Unit point of contact (Implementation Manager or Customer Success Manager) to begin Add to Mobile Wallet. Unit guides you through Visa DPS program setup and BIN configuration. Enablement runs on Visa, Apple, and Google timelines, so start these steps early.
Program & legal setup
Unit handles program registration with Visa; you provide a few inputs along the way:
- Mobile wallet metadata for Visa brand approval — Unit submits this to Visa:
- Card art — reuse your physical card design, or send a new 1536×969px landscape .png (no chip, cardholder name, PAN, expiration date, or rounded edges; include a white or Visa-blue Visa logo). Subject to Visa brand approval (~5 business days once your program is approved).
- App icon — a 100×100px .png, color to the edges, no rounded corners.
- Card label — what the card is called when added to the wallet.
- Apple Wallet contact — a point of contact who can sign the Apple NDA (full name, phone, email, business address). Unit submits this to Visa.
- Terms & conditions — Unit coordinates Apple Wallet T&Cs through Visa DPS (business-card issuers view only, no signature). Google and Samsung agreements are also coordinated through Unit and Visa.
- Visa Cardholder Agreement — complete yours; all customers must agree before adding a card.
- Privacy Policy & Terms — publish on your website; Visa surfaces these via "Additional Information" in the wallet.
Your Unit point of contact will let you know when your cards are ready to add to wallet.
Prerequisites
- An executed NDA with Unit.
- A mobile app — native iOS/Android, or a framework like React Native or Flutter.
- BINs configured for tokenization — if not already done, contact Unit. Can take up to 4 weeks.
- BINs configured for SDK use with Visa. Takes 10–20 business days and must be complete before testing.
- A sponsorship agreement executed with your BIN sponsor (via DocuSign).
Compliance
- Deposit Agreement — if your cards already support mobile wallets, no additional language is needed.
- End customer — Unit and Visa ensure the correct terms are presented to and consented by your end customer before a card is added.
- Partner agreements — Unit coordinates Apple Pay, Google Pay, and Samsung Pay registration through Visa DPS. Your app may still need wallet-specific technical setup — see the platform sections below.
Confirmation checklist
Before you build, confirm the split with your Unit point of contact:
| Unit handles | You provide |
|---|---|
| Program enabled for Apple Pay / Google Pay on Visa DPS | Your platform: native iOS, Android, or React Native |
| BIN(s) token-eligible and configured for SDK use | Mobile wallet metadata (card art, colors, app icon, card label) |
| Visa program registration and brand approval | Sponsorship agreement with your BIN sponsor (DocuSign) |
| Visa SDK binaries + Visa App ID | iOS: a contact for Apple SMS verification |
| Google: Unit submits your Merchant ID + provisioning model to Visa | Android: Issuer Console profile + UPP API intake form (with Visa's aggregator Merchant ID); send Unit your Merchant ID + provisioning model |
Testing
- Testing is done in production — Visa requires it, on a physical device (no simulators or emulators).
- The SDK allows up to 7 provisioning attempts per device / 24-hour period. Contact Unit if you hit the limit.
- Distribute iOS test builds via TestFlight.
iOS — Apple Pay
To support Apple Pay, Unit enables your card program on Visa DPS and provides the Visa SDK and mobile wallet payload API. Your development team completes the Apple-specific integration steps below.
Apple Pay tokenization runs through the Apple Partner Hub, which Visa manages end to end. Unit provides Apple your SMS-verification contact and the signed contract. Apple operates on a biweekly launch cadence, and once your program is approved, tokenization typically completes within about 10 business days. The push-provisioning (SDK) entitlement and integration steps are below.
What Unit handles
- Program registration, brand approval, and metadata submission to Visa
- BIN configuration for Apple Pay in-app provisioning
- Coordinating Apple Partner Hub enrollment with Visa — submitting your SMS-verification contact and signed contract
- Apple Wallet terms and conditions presented to your end customers
What you implement
- Integrate the Visa Digital Enablement SDK in your iOS app
- Request the Apple Pay in-app provisioning entitlement for your app
- Configure the Wallet capability and your provisioning profile in Apple Developer
- Provide a point of contact + mobile number for Apple's SMS verification (Unit submits it)
- Call Unit's Get Mobile Wallet Payload API to provision cards
Apple Pay Prerequirements
Request Apple Pay In-app provisioning entitlement
-
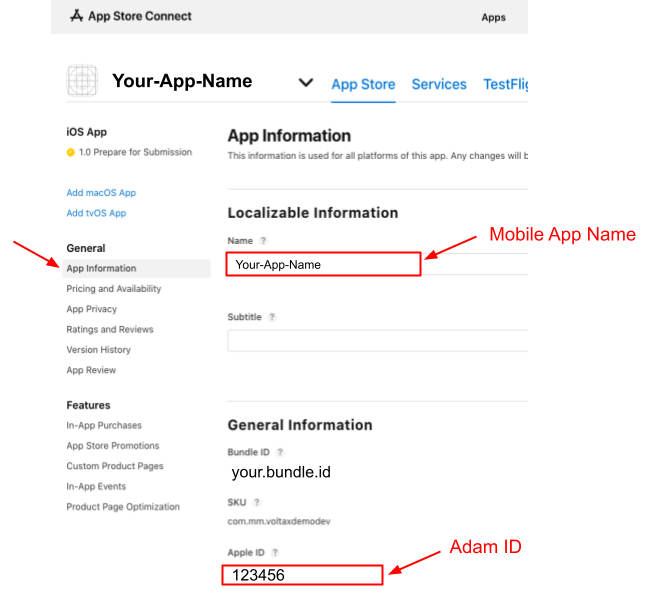
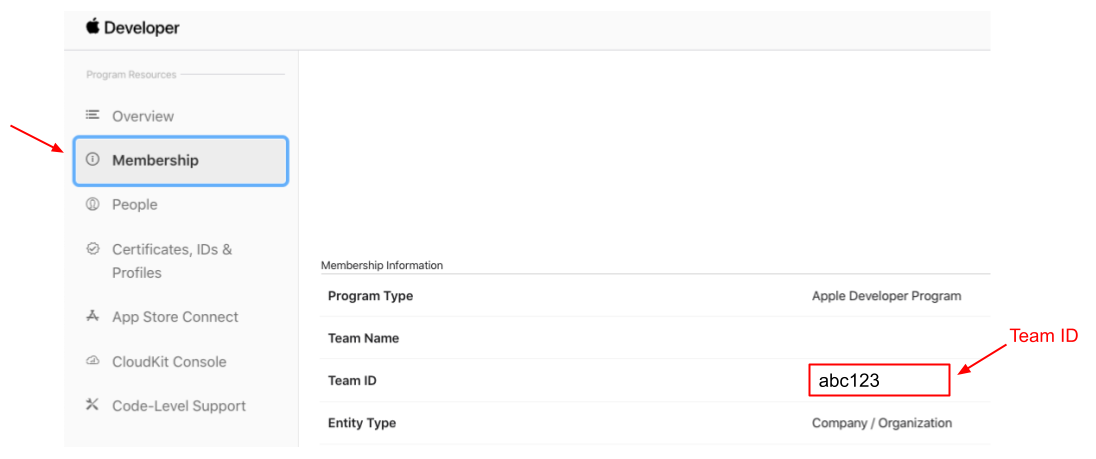
For each production instance of the app that will be used, get the Mobile App Name, Team ID, and Adam ID.
-
The Mobile App Name and the Adam ID can be found in the App Store Connect after selecting one of your apps:
-
The Team ID can be found in the Apple developer account under "Membership" section:
-
Fill out Apple's In-App Provisioning Submission Form to request the Apple Pay in-app provisioning entitlement.
- Once the entitlement is granted by Apple, include it in your provisioning profile.
- Send your Unit contact the same app details (Mobile App Name, Team ID, Adam ID) and the entitlement confirmation from Apple once you receive it.
Apple Partner Hub approval contacts
This step is part of the Apple Partner Hub approval (the tokenization step Visa manages), not the SDK integration. For that approval, Apple verifies the parties involved by SMS. Unit collects a point of contact and mobile number for your organization, your bank partner, and Unit, and submits them with the request.
- Provide a named point of contact and mobile number for your organization.
- Confirm that the contact can receive SMS messages from Apple and respond to requests for review, confirmation, or signature.
Apple typically responds within 24–48 hours of receiving the required information. Overall timelines depend on how quickly each party responds to Apple's requests.
Setup your App in Apple Developer Portal once entitlement is granted by Apple
Add the in-app provisioning entitlement
- Sign in to your Apple developer account.
- Navigate to 'Certificates, Identifier & Profiles'.
- Select "Distribution" underneath the "Profiles" heading on the sidebar.
- Select the distribution iOS provisioning profile that will be used to deploy the app to the iTunes App Store.
- Select "Apple Pay In-App Provisioning Distribution" entitlement from the drop down to add the entitlement to the profile.
- Once the entitlement is added, follow the standard process to release the app into the App Store.
Add Wallet Capability
- Sign in to your Apple developer account.
- Navigate to 'Certificates, Identifier & Profiles'.
- Select "App IDs" underneath the "Identifiers" heading on the sidebar.
- Select the app identifier that will be used to deploy the app to the iTunes App Store.
- Under "Capabilities" tab, select the "Wallet" capability:

Integration steps
This section describes the technical steps needed to integrate with Visa's SDK and add a Unit card to the mobile Wallet.
Xcode setup verification
Wallet Capability
- Go to "Signing & Capabilities" tab of your target.
- Verify that Wallet capability is there.
In-App Provisioning entitlement
- Open your project
.entitlementfile in Xcode. - Add the Boolean key
com.apple.developer.payment-pass-provisioningis set to1(true).
Add Visa SDK to your Xcode project
-
Drag and drop the following frameworks into the XCode project:
- VisaPushProvisioning.xcframework
- VisaInAppModuleCore.xcframework
- VisaAnalytics.xcframework
- VisaFeatureModuleCore.xcframework
- VisaMobileFoundation.xcframework
- RLTMXProfiling.xcframework
- RLTMXProfilingConnections.xcframework
-
Select "Copy items if needed" (if not already selected) and click on "Finish".
-
Make sure "Embed & Sign" is selected for all the above XCFrameworks.
Visa SDK Configuration
Inside the application didFinishLaunchingWithOptions method in the AppDelegate.swift, configure VisaInAppCore as follows:
// Setup Visa SDK Config
let visaInAppConfig = VisaInAppConfig(environment: .Production, appId: "b8186bd9-fcba-b77a-11e3-1c0d2e5a3501")
do {
    try VisaInAppCore.configure(config: visaInAppConfig)
} catch {
    // handle error
}
Setup the environment (.Production or .Sandbox).
Add to Wallet flow
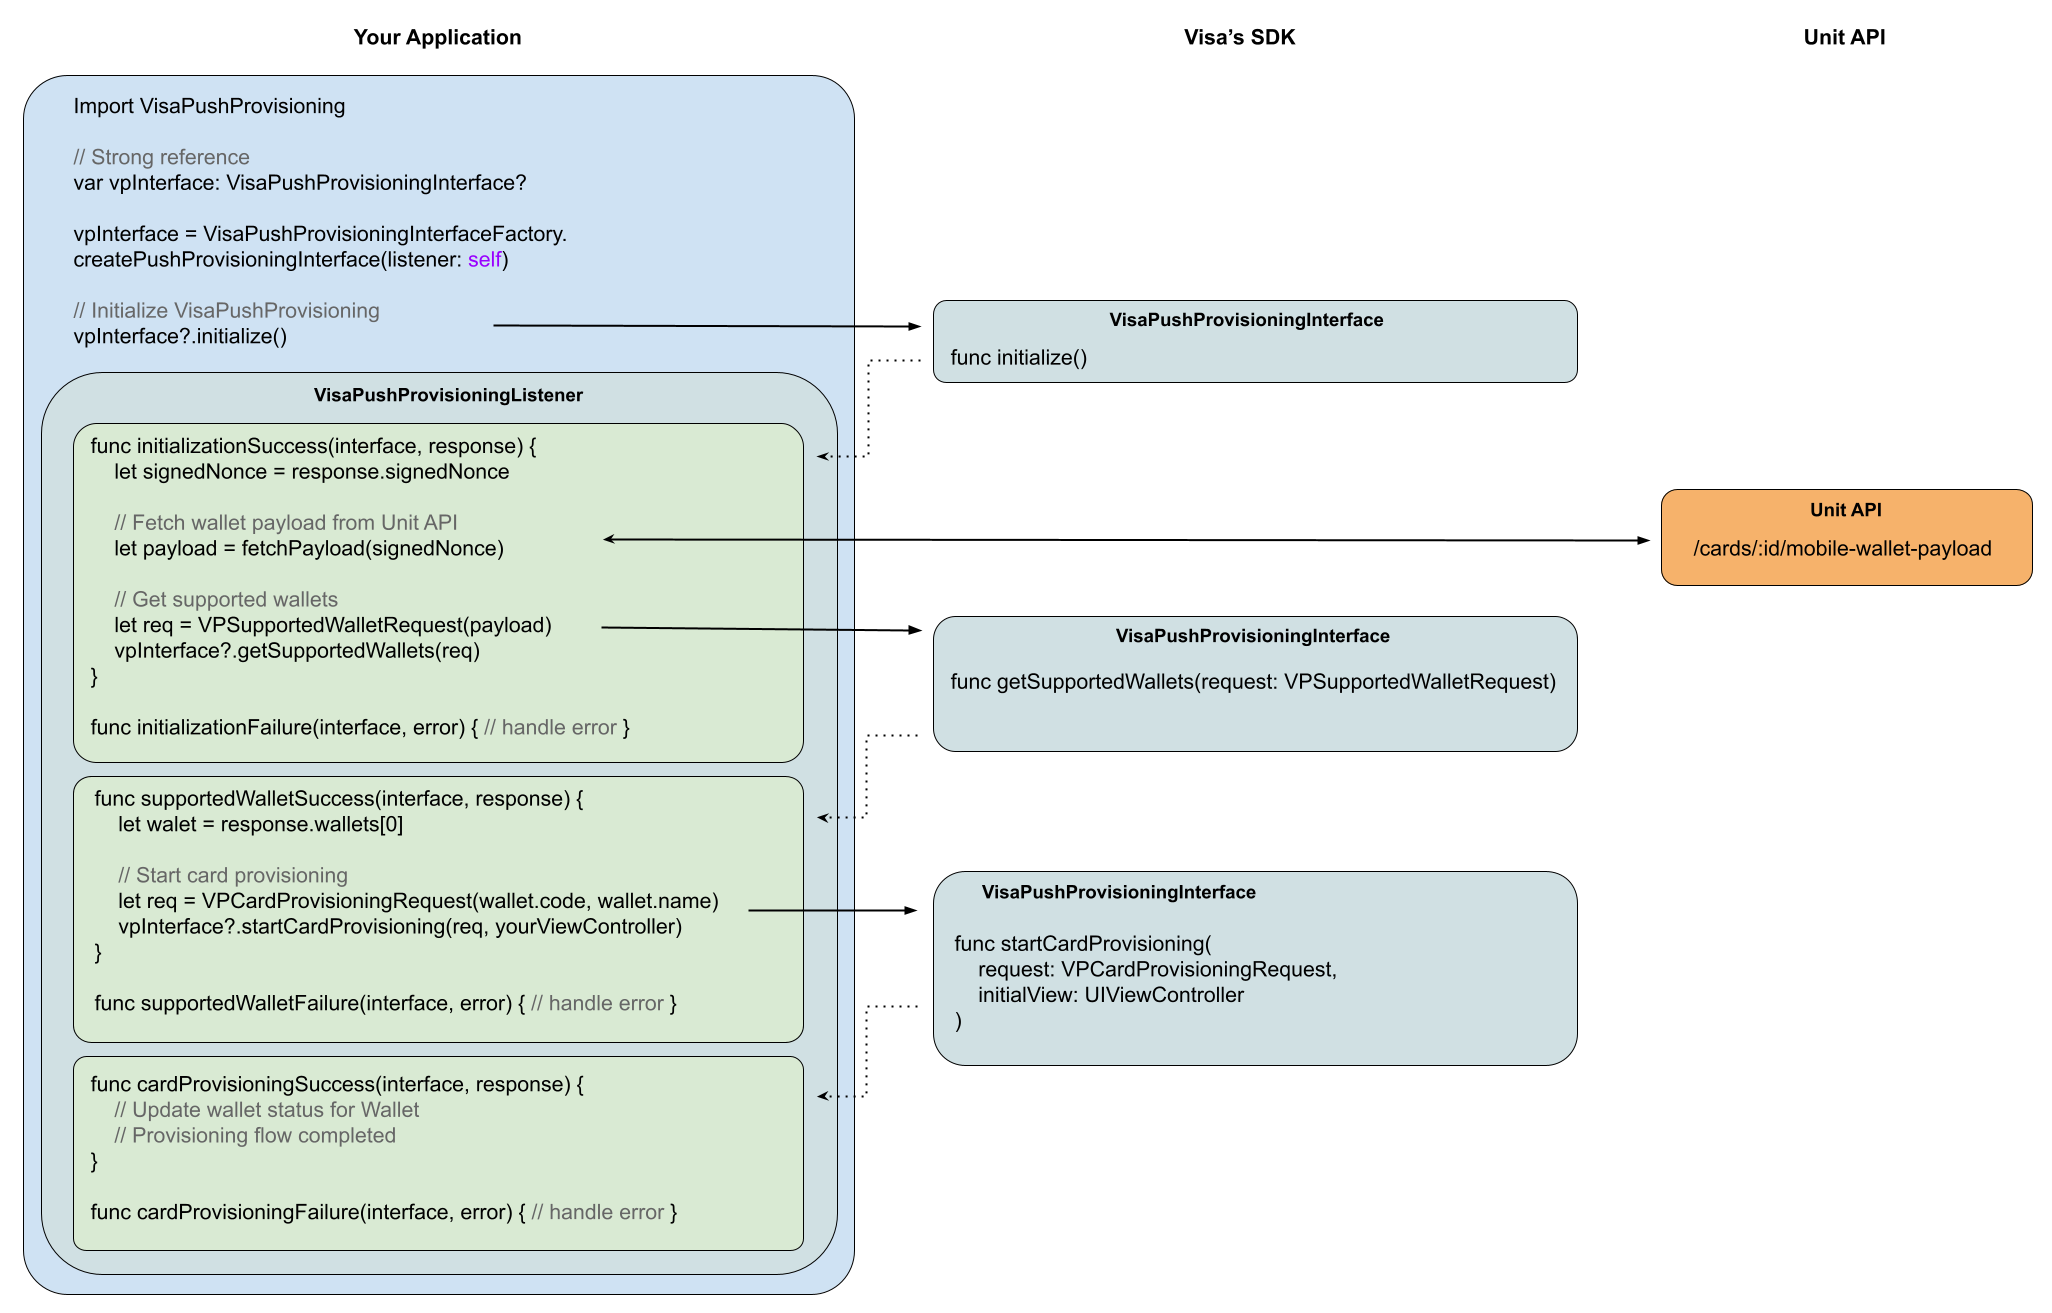
The following diagram demonstrates the Add to Wallet flow.
Below the diagram, you will find an explanation for each step in the flow.
Step 1 - Hold a strong reference to VisaPushProvisioningInterface
var vpInterface: VisaPushProvisioningInterface?
Step 2 - Initialize the VisaPushProvisioningInterface instance and implement the VisaPushProvisioningListener
Initialize the VisaPushProvisioningInterface instance in the init() method of your class:
vpInterface = VisaPushProvisioningInterfaceFactory.createPushProvisioningInterface(listener: self)
Declare the VisaPushProvisioningListener methods, we will implement them later:
func initializationSuccess(pushProvisioningInterface: VisaPushProvisioningInterface, response: VPInitResponse) { }
func initializationFailure(pushProvisioningInterface: VisaPushProvisioningInterface, error: VPError) { }

func supportedWalletSuccess(pushProvisioningInterface: VisaPushProvisioningInterface, response: VPSupportedWalletResponse) { }
func supportedWalletFailure(pushProvisioningInterface: VisaPushProvisioningInterface, error: VPError) { }

func cardProvisioningSuccess(pushProvisioningInterface: VisaPushProvisioningInterface, response: VPCardProvisioningResponse) { }
func cardProvisioningFailure(pushProvisioningInterface: VisaPushProvisioningInterface, error: VPError) { }
Step 3 - Initialize Visa SDK and get the signedNonce
Call to initialize() method
self.vpInterface?.initialize()
Handle initialization callbacks of the VisaPushProvisioningListener
func initializationSuccess(pushProvisioningInterface: VisaPushProvisioningInterface, response: VPInitResponse) {
  // Get the signedNonce
  let signedNonce = response.signedNonce
}

func initializationFailure (pushProvisioningInterface: VisaPushProvisioningInterface, error: VPError) {
  // handle error
}
Step 4 - Get wallet payload from Unit API
Get the mobile wallet encrypted payload for a specified Unit card from Unit API. Read more details in Unit get mobile wallet payload docs.
Step 5 - Get supported wallets
Call to getSupportedWallets(request: VPSupportedWalletRequest) method using the payload from step 4
let request = VPSupportedWalletRequest(encPayload: payload)
self.vpInterface?.getSupportedWallets(request: request)
Handle getSupportedWallets callbacks of the VisaPushProvisioningListener
func supportedWalletSuccess(pushProvisioningInterface: VisaPushProvisioningInterface, response: VPSupportedWalletResponse) {
  let wallet = response.wallets[0]
}

func supportedWalletFailure(pushProvisioningInterface: VisaPushProvisioningInterface, error: VPError) {
  // handle error
}
Step 6 - Start card provisioning
Call to startCardProvisioning(request: VPSupportedWalletRequest, initialView: UIViewController) method
// use a supported wallet to initialize the VPCardProvisioningRequest
let request = VPCardProvisioningRequest(walletCode: wallet.code, walletName: wallet.name)

// call to startCardProvisioning() with the request and a UIViewController to show the Apple Pay screen on
// if your current class is a UIViewController, you can pass 'self'
self.vpInterface?.startCardProvisioning(request: request, initialView: self)
Handle startCardProvisioning callbacks of the VisaPushProvisioningListener
func cardProvisioningSuccess(pushProvisioningInterface: VisaPushProvisioningInterface, response: VPCardProvisioningResponse) {
  // update wallet status for Wallet
  // provisioning flow completed, you can update the UI
}

func cardProvisioningFailure(pushProvisioningInterface: VisaPushProvisioningInterface, error: VPError) {
  // handle error
}
iOS - Add to Wallet Sample App
Steps Before running the sample app
- Open the
UnitAddToWalletSampleApp.xcworkspaceproject located inUnitAddToWalletSampleAppfolder. - Open
UNConstants.swiftfile. - Set the
customerTokenvariable with your Unit customer token:
static let customerToken: String? = YOUR_CUSTOMER_TOKEN
- Set the
cardIdvariable with your Unit's cardId:
static let cardId: String? = YOUR_CARD_ID
- In
UnitAddToWalletSampleAppfolder, runpod installin the command line.
Apple In-App Provisioning Entitlement
Important: In order to fully demonstrate the add to wallet flow, you should set your app bundle identifier that granted access of In-App provisioning from apple. If you didn't grant it yet, you can follow the following steps to simulate the flow on a simulator:
Setup to run on a simulator
- Open
UnitAddToWalletSampleApp.entitlementsfile. - Add the
com.apple.developer.payment-pass-provisioningentitlement to the dictionary. - Set the added entitlement type to Boolean and set its value to
1.
For example:
<dict>
	<key>com.apple.developer.payment-pass-provisioning</key>
	<true/>
  ...
</dict>
Running the sample app
- After running the sample app, your customer card should appear on screen.
- Tap on the "Add To Apple Wallet" button.
- See the logs printed in your screen for more details.
Android — Google Pay
To support Google Pay, Unit enables your card program on Visa DPS and provides the Visa SDK and mobile wallet payload API. Your development team completes the Google-specific integration steps below.
Google Pay push provisioning runs through Google's Unified Push Provisioning (UPP) with Visa as the aggregator — this is the supported path.
What Unit handles
- Program registration, brand approval, and metadata submission to Visa
- BIN configuration for Google Pay push provisioning
- Submitting your Merchant ID and provisioning model to Visa (from what you send in Step 3), so Visa creates the card group for your implementation
- Coordination of required Google agreements through Visa DPS
What you implement
- Create your own Google Issuer Console profile and submit the UPP API intake form (see Google Pay Pre-requirements)
- Integrate the Visa Digital Enablement SDK in your Android app
- Complete Google's UX / branding review and launch process for your app
- Call Unit's Get Mobile Wallet Payload API to provision cards
Google Pay Pre-requirements
- Confirm with your point of contact at Unit that your program is enabled for Google Pay on Visa DPS.
- After Unit confirms your program is registered, follow Google's Get started with Google Pay guide to access the Google Pay Issuer Console and complete your issuer profile.
- Verify that your client BIN(s) are token eligible and set up to support the Google Pay wallet type. Unit configures this through Visa DPS.
Tokens provisioned
Google's Unified Push Provisioning (UPP) API provisions both a Device Primary Account Number (the device token stored in the wallet) and a Funding Primary Account Number (the underlying card number) by default for all new clients. Your provisioning model determines what you send Unit in Step 3 below.
Google's step-by-step instructions for apps that intend to use Google Pay
Complete Steps 1 through 3 before you begin the Visa Digital Enablement SDK integration. Return to Step 4 after app development, when you are ready to begin testing.
Step 1: Create a Google Issuer Console profile
Create a Google Issuer Console profile by following the steps outlined in Google's Get Started page.
- All single-use clients must have their own Issuer Console.
- All multi-use clients (resellers, BIN sponsors, and similar partners) and each of their sub-clients must have their own Issuer Console, whether they deliver a white-labeled app or an SDK.
Step 2: Push Provisioning API access
- Navigate to the Google Issuer Console.
- Complete Steps 1 through 4 of the Issuer Console onboarding process, including the NDA and CTA.
- Stop when Google requests a key exchange.
Clients coming behind Visa as an aggregator are not required to upload keys via the Issuer Console. Complete the Unified Push Provisioning API Intake Request instead.
Submit the intake request for Aggregator / Program Manager linking — Type of Request = "Aggregator/Program Manager linking", Network = Visa, and Aggregator Merchant ID = BCR2DN4TXL64HAC5.
Once you submit the request, Google confirms when the setup is complete.
Step 3: Provide your Merchant ID and provisioning model
After submitting the UPP intake form, send Unit your Merchant ID and provisioning model — Device Primary Account Number (DPAN) only, or DPAN and Funding Primary Account Number (FPAN). Unit submits these to Visa, who creates the card group for your Google Pay implementation. If you support DPAN and FPAN, your Visa configuration is updated to support FPAN.
This is required before field testing can begin.
Step 4: Complete Google's launch process
Complete the launch process for Android or Web accordingly. This includes UX/branding review, test case videos, field testing, and final launch approval via the Issuer Console.
UX/branding review
- Optional: You may download Google's sample app to further understand the branding guidelines.
- Review and adhere to Google's branding and user experience requirements.
- Option 1: Use Unit's common Visa presentation, located in the provided zip directory under
unit-common-README.md. - Option 2: Set the assets independently:
- Download the assets.
- Add the assets to your project.
- Follow the instructions mentioned here.
- Option 1: Use Unit's common Visa presentation, located in the provided zip directory under
- Create a slide deck of images with one screen per page of the full user journey of your app, starting from the login screen.
If you are using Unit's common Visa presentation, you need to get the wallets every time your app goes to the background, and then display the view according to the wallet's status (see step 4 of unit-common-README.md, located in the provided zip directory). This is required for the button to always be updated according to the current Google Wallet status.
Using Unit's approved UX flow
If you distribute a white-labeled app, you can use Unit's Google-approved UX flow instead of getting your own approved. On Android, in the "Add a user flow" screen, name the flow <aggregator_integrator_id> - <UX_approved_review_name> and attach the approved PDF flow Unit provides. If you already have your own approved user flow, use that instead.
Launch approval
Once approved by Google, follow the standard process to release the app to the Google Play Store.
Steps to support Samsung Pay
If you elect to support Samsung Pay push provisioning, Unit coordinates program registration through Visa DPS. Your development team completes the Samsung-specific steps below.
Steps that are required before the start of the Visa Digital Enablement SDK integration
-
Confirm with your point of contact at Unit that your program is enabled for Samsung Pay on Visa DPS.
-
Collect the 'TSP Issuer Name(s)' which are registered with Samsung
-
Verify that your client BIN(s) are token eligible and set up to support the Samsung Pay wallet type (Unit can assist with this step)
-
Create an account in the Samsung Developer Portal, if one does not already exist:
-
Review all detailed tasks required for push provisioning outlined in the Samsung Developer Portal
-
Create a New App in the Samsung Developer Portal, following their guidelines
-
Create a New Service in the Samsung Developer Portal, following their guidelines
-
Link the New Service with the App created in Samsung Developer Portal
-
Copy and save the Service ID, which is used by mobile app during push provisioning
-
Review and adhere to Samsung's branding and user experience requirements
After these steps you should move to the Visa SDK integration steps. When you are done with the integration, complete the following steps
Follow these steps after app development (when ready to begin testing)
Complete all required steps for the activation of push provisioning as outlined in the Samsung Developer Portal, which may include the following:
- Whitelist and release the new Mobile App a. Navigate to Projects > App Management > App b. Add New Release Version, upload the APK file and Register
- Submit the release for approval in the Samsung Developer Portal Once approved by Samsung, follow the standard process to release the app to the Google Play Store.
Integration Steps
This section describes the technical steps needed to integrate with Visa's SDK and add a Unit card to the mobile Wallet.
Prerequirements
Before you start with the technical integration, please follow the prerequirements below:
- The minimum Android Operating System (OS) validated for use with the VDE SDK is 9.0 (Pie).
- Due to the usage of Google's libraries and U.S. government regulations, the Android VDE SDK cannot function on certain Huawei devices.
- The minimum supported Android SDK API version is 28.
- The deployment target is Android SDK API version is 32.
- The minimum supported Kotlin version is 1.7.0.
- The minimum supported Java version is 11.
- The SDK requires to use a physical Android device and not a virtual device.
- Make sure you have the relevant wallets to which you will add cards installed on your device updated with the newest version.
Add VDE (Visa Digital Enablement) SDK to your project
-
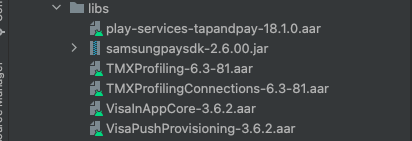
Get the push provisioning package from Unit, which consists of the following dependencies:
- VisaPushProvisioning-3.6.2.aar
- VisaInAppCore-3.6.2.aar
- TMXProfiling-6.3-81.aar
- TMXProfilingConnections-6.3-81.aar
- samsungpaysdk-2.6.00.jar
- play-services-tapandpay-18.1.0.aar
-
Add the dependencies from the previous step under the libs folder of your project:
- In Android Studio switch your folder structure from Android to Project.

- Now search for the libs folder inside the app folder.

- Paste the dependencies inside the libs folder
-
In case the libs folder doesn't exist you can create it:
- Make sure the folder structure is Project (it was explained above)
- Right click on your app name in the directory tree and go to "New" => "Directory" and name it "libs"
-
Gradle Dependencies:
a. Declare the following Gradle dependencies. Make sure to add the open source dependencies mentioned:
//Only if App is developed in kotlin and using kotlin-plugins for development then below can be
//used for kotlin coroutines dependencies as well, no need to add separate dependency.
plugins {
    id 'com.android.application'
    id 'org.jetbrains.kotlin.android'
    id 'kotlin-android-extensions'
    id 'kotlin-kapt'
}

dependencies {
    //In-App Provisioning SDK
    implementation files('libs/VisaPushProvisioning-3.6.2.aar')
    implementation files('libs/VisaInAppCore-3.6.2.aar')
    implementation files('libs/TMXProfiling-6.3-81.aar')
    implementation files('libs/TMXProfilingConnections-6.3-81.aar')
    //Samsung Pay
    implementation files('libs/samsungpaysdk-2.6.00.jar')
    //Google Pay
    implementation files('libs/play-services-tapandpay-18.1.0.aar')
    implementation "com.google.android.gms:play-services-base:18.0.0"
    //okhttp covers okhttp, okio dependency
    implementation "com.squareup.okhttp3:okhttp:4.7.2"
    implementation "com.squareup.okhttp3:logging-interceptor:4.7.2"
    implementation "net.minidev:json-smart:2.4.11"
    //For TrustDefender
    implementation "commons-io:commons-io:2.13.0"
    implementation "commons-codec:commons-codec:1.16.0"
    //Nimbus
    implementation "com.nimbusds:nimbus-jose-jwt:8.2.1"
    implementation "com.google.code.gson:gson:2.8.5"
    implementation "androidx.lifecycle:lifecycle-process:2.5.1"
    implementation 'androidx.lifecycle:lifecycle-extensions:2.2.0'
    //Analytics Database
    implementation "androidx.room:room-runtime:2.4.3"
    implementation "androidx.room:room-ktx:2.4.3"
    kapt "androidx.room:room-compiler:2.4.3"
    //Instant apps
    implementation "com.google.android.gms:play-services-instantapps:18.0.0"
    //Play Integrity
    implementation "com.google.android.play:integrity:1.0.1"

    //If kotlin plugins are not added then below dependencies require to add to kotlin coroutines
    //used by SDK.
    implementation "org.jetbrains.kotlinx:kotlinx-coroutines-core:$any-latest-version"
    implementation "org.jetbrains.kotlinx:kotlinx-coroutines-android:$any-latest-version"
}
-
Additional instructions for Samsung Pay
a. If the target device includes Android 11 and above, add the below in the app's AndroidManifest.xml file. If this is not added, the VDE SDK may return a 'NOT_INSTALLED' status.
<queries>
    <package android:name="com.samsung.android.spay" />
</queries>
b. Add the below in AndroidManifest.xml file, if VDE SDK has returned a 'NOT_AVAILABLE' status.
<meta-data android:name="spay_sdk_api_level" android:value="2.6" />
<meta-data android:name="debug_mode" android:value="N" />
Configure VDE SDK in your custom application file
Import the following libraries:
import com.visa.mobileEnablement.inAppCore.*
import com.visa.mobileEnablement.pushProvisioning.*
import androidx.lifecycle.ProcessLifecycleOwner
Inside your init() configure VisaInAppCore as follows:
val visaInAppConfig = VisaInAppConfig(VisaInAppEnvironment.Production, "b8186bd9-fcba-b77a-11e3-1c0d2e5a3501")
VisaInAppCore.configure(context, visaInAppConfig)
//recognizes lifecycles changes
ProcessLifecycleOwner.get().lifecycle.addObserver(VisaInAppCoreApplicationObserver())
Setup the environment (.Production or .Sandbox).
Add to Wallet flow
Overview
The following diagram demonstrates the Add to Wallet flow.
Below the diagram, you will find an explanation for each step in the flow.

Step 1 - Hold a reference to VisaPushProvisioningInterface
var pushProvisioningInterface: VisaPushProvisioningInterface? = null
Step 2 - Initialize the VisaPushProvisioningInterface instance and implement the VisaPushProvisioningListener interface in your class
Initialize the VisaPushProvisioningInterface instance in the init() method of your class:
//'this' is the object that implements VisaPushProvisioningListener
pushProvisioningInterface = VisaPushProvisioningInterfaceFactory.createPushProvisioningInterface(this)
Declare the VisaPushProvisioningListener methods, we will implement them later:
override fun initializationSuccess(
    pushProvisioningInterface: VisaPushProvisioningInterface,
    response: VPInitResponse
) { }

override fun initializationFailure(
    pushProvisioningInterface: VisaPushProvisioningInterface,
    error: VPError
) { }

override fun cardProvisioningSuccess(
    pushProvisioningInterface: VisaPushProvisioningInterface,
    response: VPCardProvisioningResponse
) { }

override fun cardProvisioningFailure(
    pushProvisioningInterface: VisaPushProvisioningInterface,
    error: VPError
) { }

override fun supportedWalletSuccess(
    pushProvisioningInterface: VisaPushProvisioningInterface,
    response: VPSupportedWalletResponse
) { }

override fun supportedWalletFailure(
    pushProvisioningInterface: VisaPushProvisioningInterface,
    error: VPError
) { }
Step 3 - Initialize Visa SDK and get the signedNonce
Call to initialize() method
pushProvisioningInterface?.initialize()
Handle initialization callbacks of the VisaPushProvisioningListener
override fun initializationSuccess(
    pushProvisioningInterface: VisaPushProvisioningInterface,
    response: VPInitResponse
) {
    val signedNonce = response.signedNonce
}

override fun initializationFailure(
    pushProvisioningInterface: VisaPushProvisioningInterface,
    error: VPError
) {
    //handle error
}
Step 4 - Get wallet payload from Unit API
Get the mobile wallet encrypted payload for a specified Unit card from Unit API. Read more details in Unit get mobile wallet payload docs.
Step 5 - Get supported wallets
Call to getSupportedWallets(request: VPSupportedWalletRequest) method using the payload from step 4
val vpSupportedWalletRequest = VPSupportedWalletRequest(payload)
pushProvisioningInterface?.getSupportedWallets(vpSupportedWalletRequest)
Handle getSupportedWallets callbacks of the VisaPushProvisioningListener
override fun supportedWalletSuccess(
   pushProvisioningInterface: VisaPushProvisioningInterface,
   response: VPSupportedWalletResponse
) {
   val wallet = response.wallets
}

override fun supportedWalletFailure(
   pushProvisioningInterface: VisaPushProvisioningInterface,
   error: VPError
) {
   // handle error
}
Step 6 - Start card provisioning
Call to startCardProvisioning(context: Context, request: VPCardProvisioningRequest) method:
val vpCardProvisioningRequest = VPCardProvisioningRequest(wallet.code, wallet.name)
pushProvisioningInterface?.startCardProvisioning(context, vpCardProvisioningRequest)
Handle startCardProvisioning callbacks of the VisaPushProvisioningListener
override fun cardProvisioningSuccess(
    pushProvisioningInterface: VisaPushProvisioningInterface,
    response: VPCardProvisioningResponse
) {
    // update wallet status for Wallet
    // provisioning flow completed, you can update the UI}
}

override fun cardProvisioningFailure(
    pushProvisioningInterface: VisaPushProvisioningInterface,
    error: VPError
) {
    // handle error
}
Android - Add to Wallet Sample App
This sample app demonstrates how to integrate with Visa's SDK in your app.
Steps Before running the sample app
- Open the project inside
UnitWalletDemofolder in the Android Studio. - Open
UNConstantsfile. - Set the
customerTokenvariable with your Unit customer token:
val customerToken: String? = YOUR_CUSTOMER_TOKEN
- Set the
cardIdvariable with your Unit's card id:
val cardId: String? = YOUR_CARD_ID
- Set the
appIdvariable with your Visa's app id:
val appId: String? = YOUR_VISA_APP_ID
Running the sample app
- After running the sample app, your customer card should appear on screen.
- Tap on "Add To G Pay" button.
- See the logs printed in your screen for more details.
React Native
Prerequirements
Complete the shared onboarding in Before you start with your Unit point of contact, then complete the platform prerequisites and integration steps for each wallet you support:
- To support Apple Pay, complete the Apple Pay Prerequirements and iOS integration steps.
- To support Google Pay, complete the Google Pay Prerequirements and Android integration steps.
Steps to integrate with the Visa SDK
iOS
Follow the following steps in iOS Xcode setup verification:
- Xcode setup verification.
- Add Visa SDK to your Xcode project.
Android
Follow the following steps in Android integration steps:
- Prerequirements.
- Add VDE (Visa Digital Enablement) SDK to your project.
To make a Kotlin module, additional Gradle dependencies are required.
The file android/build.gradle has to contain the following additional lines:
buildscript {
    ext {
        kotlin_version = “[version]” //(ex:1.6.0)
    }
}
dependencies {
    classpath(“org.jetbrains.kotlin:kotlin-gradle-plugin:$kotlin_version”)
}
Visa SDK Configuration Module
Please note this configuration should be made only once in an application integrating with the VDE SDK.
If the mobile app configures VisaInAppConfig more than once, nothing will happen if it is called with the same parameters, otherwise the VDE SDK will produce an exception as VisaInAppConfigException and the configs will not be updated.
iOS
Export a Swift module
Create a .swift file named VdeSdkConfigurationModule:
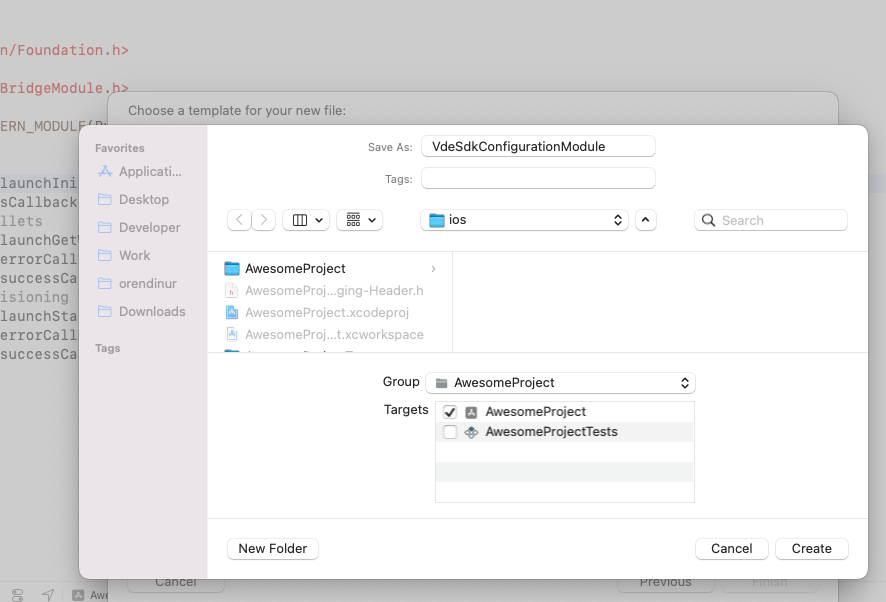
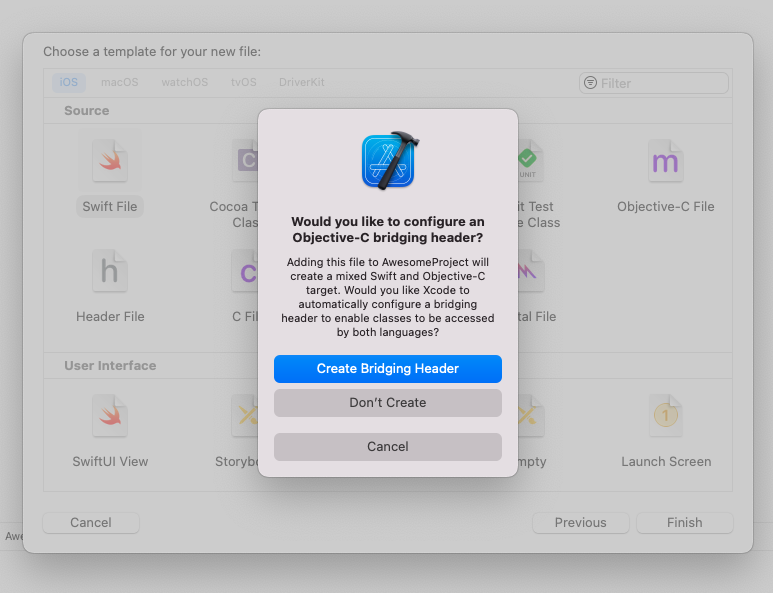
Agree to create a Bridging Header:
In the Bridge file:
#import <React/RCTBridgeModule.h>
In the .swift file:
//
//  VdeSdkConfigurationModule.swift
//

import Foundation
import VisaInAppModuleCore

@objc(VdeSdkConfigurationModule)
class VdeSdkConfigurationModule: NSObject {
  var configureSdkPromise: (resolve: RCTPromiseResolveBlock?, reject: RCTPromiseRejectBlock?)

  @objc static func requiresMainQueueSetup() -> Bool {
    return false
  }

  @objc
  func configureSdk(
    _ appId: String, environment: String, resolve: @escaping RCTPromiseResolveBlock,
    rejecter: @escaping RCTPromiseRejectBlock
  ) {
    configureSdkPromise.resolve = resolve
    configureSdkPromise.reject = rejecter
    let visaInAppConfig = VisaInAppConfig(
      environment: getEnvironment(environment: environment),
      appId: appId)
    do {
      try VisaInAppCore.configure(config: visaInAppConfig)
      configureSdkPromise.resolve?(["Success"])
    } catch {
      configureSdkPromise.reject?("configureSdk_error", "Failed to configure sdk", nil)
      print(error)
    }
  }

  // Get proper environment constant
  func getEnvironment(environment: String) -> VisaInAppEnvironment {
    if environment.lowercased().contains("prod") {
      return VisaInAppEnvironment.Production
    } else {
      return VisaInAppEnvironment.Sandbox
    }
  }
}
Create an objective-c file named VdeSdkConfigurationModule (the same name as .swift file)
- An empty file
To expose our swift methods to RN add:
//
//  VdeSdkConfigurationModule.m
//

#import <Foundation/Foundation.h>
#import <React/RCTBridgeModule.h>

@interface RCT_EXTERN_MODULE(VdeSdkConfigurationModule, NSObject)
RCT_EXTERN_METHOD(configureSdk: (NSString *)appId
                  environment: (NSString *)appId
                  resolve: (RCTPromiseResolveBlock)resolve
                  rejecter:(RCTPromiseRejectBlock)reject)

@end
Android
Android Module Creation
The module integrating the VDE SDK Configuration methods is implemented as a native class inside
the android folder, under the directory tree corresponding to the project name and package. As an
example: android/app/src/main/java/com/your-app-name/VDEConfigurationModule.kotlin
Create a kotlin class named VdeSdkConfigurationModule.
In this kotlin class:
class VdeSdkConfigurationModule (reactContext: ReactApplicationContext) : ReactContextBaseJavaModule(reactContext) {

  private lateinit var visaInAppConfig: VisaInAppConfig

  @ReactMethod
  fun configureSdk(appId: String = "b8186bd9-fcba-b77a-11e3-1c0d2e5a3501",
                   environment: String = "Production",
                   configureSdkPromise: Promise
  ){
    visaInAppConfig = VisaInAppConfig(getEnvironment(environment), appId)
    VisaInAppCore.configure(reactApplicationContext.applicationContext, visaInAppConfig)
    UiThreadUtil.runOnUiThread {
      // recognizes when the application is in the background or foreground.
      ProcessLifecycleOwner.get()
        .lifecycle
        .addObserver(VisaInAppCoreApplicationObserver())
    }
    configureSdkPromise.resolve("Success")
  }

  private fun getEnvironment(env: String): VisaInAppEnvironment {
    if (env.lowercase(Locale.ROOT).contains("prod")) {
      return VisaInAppEnvironment.Production
    }
    return VisaInAppEnvironment.Sandbox
  }

  override fun getName(): String {
    return "VdeSdkConfigurationModule"
  }
}
Android Module Registration
Once a native module is written, it needs to be registered with React Native. To do so, the native module is added to a ReactPackage which is then registered with React Native.
React Native invokes the method createNativeModules() on a ReactPackage in order to get the list of native modules to register.
For Android, if a module is not instantiated and returned in createNativeModules, it will not be available from JavaScript.
To add the Native Module to ReactPackage, create a new Class named MyAppPackage that implements ReactPackage inside the android/app/src/main/java/com/your-app-name/ folder, and add the following code:
import android.view.View
import com.facebook.react.ReactPackage
import com.facebook.react.bridge.NativeModule
import com.facebook.react.bridge.ReactApplicationContext
import com.facebook.react.uimanager.ReactShadowNode
import com.facebook.react.uimanager.ViewManager

class MyAppPackage : ReactPackage {

    override fun createViewManagers(
        reactContext: ReactApplicationContext
    ): MutableList<ViewManager<View, ReactShadowNode<*>>> = mutableListOf()

    override fun createNativeModules(
        reactContext: ReactApplicationContext
    ): MutableList<NativeModule> {
        var modules: ArrayList<NativeModule> = ArrayList()
        modules.add(VdeSdkConfigurationModule(reactContext))
        return modules
    }
}
Once the module is imported with this code, it needs to be registered to the list of packages returned in ReactNativeHost's getPackages() method.
In android/app/src/main/java/com/your-app-name/MainApplication.java, locate
ReactNativeHost’s getPackages() method and add your package to the packages list getPackages() returns:
  @Override
  protected List<ReactPackage> getPackages() {
    @SuppressWarnings("UnnecessaryLocalVariable")
    List<ReactPackage> packages = new PackageList(this).getPackages();
    // Packages that cannot be autolinked yet can be added manually here, for example:
    // packages.add(new MyReactNativePackage());
    packages.add(new MyAppPackage());

    return packages;
  }
The module is now successfully registered.
Module access from Javascript
In order to access your native module from JavaScript you need to first import NativeModules from React Native:
import { NativeModules } from 'react-native';
You can then access the VdeSdkConfigurationModule native module off of NativeModules:
const { VdeSdkConfigurationModule } = NativeModules;
Now that you have the VdeSdkConfigurationModule available, you can invoke your native method configureSdk:
const configureSdk = async () => {
  try {
    const response = await VdeSdkConfigurationModule.configureSdk(AppId, "production");
  } catch (error) {
    console.error(error);
  }
};
Before you try to access the native modules, make sure you rebuild the iOS/Android project.
Visa SDK Push Provisioning Module
iOS
Export a Swift module
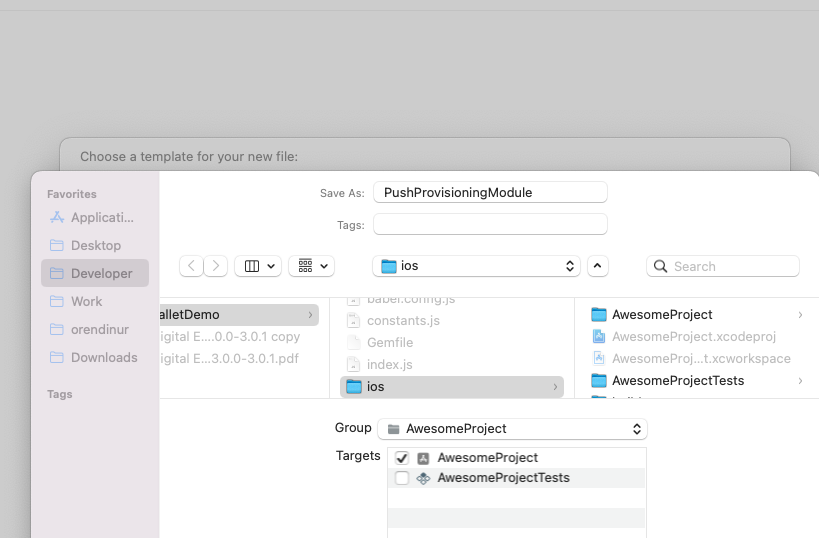
Create a .swift file named PushProvisioningModule
- In the .swift file:
//
//  PushProvisioningModule.swift
//

import Foundation
import UIKit
import VisaPushProvisioning

@objc(PushProvisioningModule)
class PushProvisioningModule: NSObject, VisaPushProvisioningListener {

  var provisioningInterface: VisaPushProvisioningInterface?
  var APPLE_WALLET_CODE = "ApplePayPushProvision"

  var launchInitializePromise: (resolve: RCTPromiseResolveBlock?, reject: RCTPromiseRejectBlock?)
  var launchGetWalletsPromise: (resolve: RCTPromiseResolveBlock?, reject: RCTPromiseRejectBlock?)
  var launchStartCardProvisioningPromise:
    (resolve: RCTPromiseResolveBlock?, reject: RCTPromiseRejectBlock?)

  @objc
  static func requiresMainQueueSetup() -> Bool {
    return false
  }

  // SDK Initialize
  @objc
  func launchInitialize(
    _ resolve: @escaping RCTPromiseResolveBlock, rejecter: @escaping RCTPromiseRejectBlock
  ) {
    launchInitializePromise.resolve = resolve
    launchInitializePromise.reject = rejecter
    provisioningInterface =
      VisaPushProvisioningInterfaceFactory.createPushProvisioningInterface(listener: self)
    provisioningInterface?.initialize()
  }

  // Get Eligible Wallets
  @objc
  func launchGetWallets(
    _ params: String, resolve: @escaping RCTPromiseResolveBlock,
    rejecter: @escaping RCTPromiseRejectBlock
  ) {
    launchGetWalletsPromise.resolve = resolve
    launchGetWalletsPromise.reject = rejecter
    // convert JSON param
    if let data = params.data(using: .utf8) {
      do {
        if let args = try JSONSerialization.jsonObject(with: data, options: []) as? [String: Any],
          let encPayload = args["encPayload"] as? String
        {
          let request = VPSupportedWalletRequest(encPayload: encPayload)
          provisioningInterface?.getSupportedWallets(request: request)
        }
      } catch {
        print(error.localizedDescription)
      }
    }
  }

  // Start Card Provisioning
  @objc
  func launchStartCardProvisioning(
    _ params: String, resolve: @escaping RCTPromiseResolveBlock,
    rejecter: @escaping RCTPromiseRejectBlock
  ) {
    launchStartCardProvisioningPromise.resolve = resolve
    launchStartCardProvisioningPromise.reject = rejecter
    //     convert JSON param
    if let data = params.data(using: .utf8) {
      do {
        if let args = try JSONSerialization.jsonObject(with: data, options: []) as? [String: Any],
          let walletCode = args["walletCode"] as? String,
          let walletName = args["walletName"] as? String
        {
          let code =
            walletCode == APPLE_WALLET_CODE
            ? VPSupportedWalletCode.ApplePayPushProvision : VPSupportedWalletCode.VCEHPushProvision
          let request = VPCardProvisioningRequest(walletCode: code, walletName: walletName)
          guard let window = UIApplication.shared.delegate?.window as? UIWindow,
            let rootViewController = window.rootViewController
          else {
            return
          }
          provisioningInterface?.startCardProvisioning(
            request: request,
            initialView: rootViewController)
        }
      } catch {
        print(error.localizedDescription)
      }
    }
  }

  // Success callback after SDK initialize method call
  func initializationSuccess(
    pushProvisioningInterface: VisaPushProvisioningInterface,
    response:
      VPInitResponse
  ) {

    launchInitializePromise.resolve?([response.toJsonString() as Any])
  }
  // Failure callback after SDK initialize method call
  func initializationFailure(
    pushProvisioningInterface: VisaPushProvisioningInterface,
    error:
      VPError
  ) {
    launchInitializePromise.reject?("initializationFailure", error.toJsonString(), nil)
  }

  // Success callback after SDK getSupportedWallets method call
  func supportedWalletSuccess(
    pushProvisioningInterface: VisaPushProvisioningInterface,
    response: VPSupportedWalletResponse
  ) {
    launchGetWalletsPromise.resolve?([response.toJsonString() as Any])
  }
  // Failure callback after SDK getSupportedWallets method call
  func supportedWalletFailure(
    pushProvisioningInterface: VisaPushProvisioningInterface,
    error:
      VPError
  ) {
    launchGetWalletsPromise.reject?("supportedWalletFailure", error.toJsonString(), nil)
  }

  // Success callback after SDK startCardProvisioning method call
  func cardProvisioningSuccess(
    pushProvisioningInterface: VisaPushProvisioningInterface,
    response: VPCardProvisioningResponse
  ) {
    launchStartCardProvisioningPromise.resolve?([response.toJsonString() as Any])
  }
  // Failure callback after SDK startCardProvisioning method call
  func cardProvisioningFailure(
    pushProvisioningInterface: VisaPushProvisioningInterface,
    error:
      VPError
  ) {
    launchStartCardProvisioningPromise.reject?("cardProvisioningFailure", error.toJsonString(), nil)
  }
}
Create an objective-c file named PushProvisioningModule (the same name as .swift file)
- An empty file
In the Objective-c file:
- To expose our swift methods to RN add:
//
//  PushProvisioningModule.m
//

#import <Foundation/Foundation.h>
#import <React/RCTBridgeModule.h>
@interface RCT_EXTERN_MODULE(PushProvisioningModule, NSObject)
    // SDK Initialize
    RCT_EXTERN_METHOD(launchInitialize: (RCTPromiseResolveBlock)resolve
                      rejecter: (RCTPromiseRejectBlock)reject)

    // Get Eligible Wallets
    RCT_EXTERN_METHOD(launchGetWallets: (NSString *)params
                      resolve: (RCTPromiseResolveBlock)resolve
                      rejecter:(RCTPromiseRejectBlock)reject)

    // Start Card Provisioning
    RCT_EXTERN_METHOD(launchStartCardProvisioning: (NSString *)params
                      resolve: (RCTPromiseResolveBlock)resolve
                      rejecter:(RCTPromiseRejectBlock)reject)
@end
Android
Android Module Creation
Create a kotlin class named PushProvisioningModule.
In this kotlin class:
For Module declaration:
- Hold a reference to
VisaPushProvisioningInterface. - Prepare the SDK
initialize,getSupportedWalletsandstartCardProvisioning, with result assignments:
class PushProvisioningModule (reactContext: ReactApplicationContext) : ReactContextBaseJavaModule(reactContext),
  VisaPushProvisioningListener {

  private lateinit var visaPushProvisioningInterface: VisaPushProvisioningInterface
  private lateinit var launchInitializePromise: Promise
  private lateinit var launchGetWalletsPromise: Promise
  private lateinit var launchStartCardProvisioningPromise: Promise
  private lateinit var gson: Gson

  override fun getName(): String {
    return "PushProvisioningModule"
  }

  @ReactMethod
  fun launchInitialize(promise: Promise) {
    gson = Gson()
    this.launchInitializePromise = promise
    visaPushProvisioningInterface =
      VisaPushProvisioningInterfaceFactory.createPushProvisioningInterface(
        this)
    visaPushProvisioningInterface.initialize()
  }

  @ReactMethod
  fun launchGetWallets(params: String, promise: Promise){
    this.launchGetWalletsPromise = promise
    visaPushProvisioningInterface.getSupportedWallets(gson.fromJson(params,
      VPSupportedWalletRequest::class.java))
  }

  @ReactMethod
  fun launchStartCardProvisioning(params: String, promise: Promise){
    this.launchStartCardProvisioningPromise = promise
    visaPushProvisioningInterface.startCardProvisioning(reactApplicationContext.applicationContext,
      gson.fromJson(params, VPCardProvisioningRequest::class.java))
  }

  override fun initializationFailure(
    pushProvisioningInterface: VisaPushProvisioningInterface,
    error: VPError
  ) {
    this.launchInitializePromise.reject("initializationFailure", gson.toJson(error));

  }

  override fun initializationSuccess(
    pushProvisioningInterface: VisaPushProvisioningInterface,
    response: VPInitResponse
  ) {
    Log.d("PushProvisioningModule", "initialization success, got signedNonce")
    this.launchInitializePromise.resolve(gson.toJson(response));
  }

  override fun supportedWalletFailure(
    pushProvisioningInterface: VisaPushProvisioningInterface,
    error: VPError
  ) {
    Log.d("PushProvisioningModule", "initialization failed")
    this.launchGetWalletsPromise.reject("supportedWalletFailure", gson.toJson(error));
  }

  override fun supportedWalletSuccess(
    pushProvisioningInterface: VisaPushProvisioningInterface,
    response: VPSupportedWalletResponse
  ) {
    this.launchGetWalletsPromise.resolve(gson.toJson(response));
  }

  override fun cardProvisioningFailure(
    pushProvisioningInterface: VisaPushProvisioningInterface,
    error: VPError
  ) {
    this.launchStartCardProvisioningPromise.reject("cardProvisioningFailure", gson.toJson(error));

  }

  override fun cardProvisioningSuccess(
    pushProvisioningInterface: VisaPushProvisioningInterface,
    response: VPCardProvisioningResponse
  ) {
    this.launchStartCardProvisioningPromise.resolve(gson.toJson(response));
  }
}
Android Module Registration
Add the next line to the MyAppPackage class, just as you did for the VdeSdkConfigurationModule:
modules.add(PushProvisioningModule(reactContext))
Module access from Javascript
In order to access your native module from JavaScript you need to first import NativeModules from React Native:
import { NativeModules } from 'react-native';
You can then access the PushProvisioningModule native module off of NativeModules:
const { PushProvisioningModule } = NativeModules;
Now that you have the PushProvisioningModule available, you can invoke your native methods:
// To call the module method to use SDK method initialize
  const launchInitialize = async () => {
    try {
      // To call the module method to use SDK method initialize
      const response = await PushProvisioningModule.launchInitialize();
    } catch (error) {
      // Manage errors
    }
  };
// To call the module method to use SDK method getSupportedWallets
const launchGetWallets = async () => {
    try {
        // To call the module method to use SDK method initialize
        const response = await PushProvisioningModule.launchGetWallets(
            JSON.stringify({
                encPayload: encryptedPayload
            });
        }
        catch (error) {
            // Manage errors
        }
    }
};
// To call the module method to use SDK method startCardProvisioning
const launchStartCardProvisioning = async () => {
    try {
        // To call the module method to use SDK method initialize
        const response = await PushProvisioningModule.launchStartCardProvisioning(
            JSON.stringify({
                walletCode: walletCode,
                walletName: walletDescription
            });
        }
        catch (error) {
            // Manage errors
        }
    }
};
React Native - Add to Wallet Sample App
This sample app demonstrates how to integrate with Visa's SDK in your app.
Steps Before running the sample app
- Open the
UnitWalletDemoproject with your code editor. - Open the
constantsfile undersrc/shared. - Set the
UNIT_CONSTANTSvariable with your Unit's card id and customer token:
export const UNIT_CONSTANTS = {
    CARD_ID: <YOUR_CARD_ID>,
    CUSTOMER_TOKEN: <YOUR_CUSTOMER_TOKEN>
}
- Set the
VISA_CONSTANTSvariable with your Visa's App id:
export const VISA_CONSTANTS = {
    APP_ID: <YOUR_VISA_APP_ID>
}
Additional steps only for iOS:
-
In the ios folder, run
pod installin the command line. -
Follow the instructions at the Apple In-App Provisioning Entitlement section.
Running the sample app
- Start Metro
Using npm:
npm start
Using yarn:
yarn start
- Start your application by running it directly from within Xcode/Android Studio.
- After running the sample app, you should see a button that will launch the push provisioning flow once it is clicked.
- See the logs printed in your terminal for more details.